Call Now
3nh
2024-12-17
As a professional tool for color quantification, colorimeters are generally equipped with corresponding measuring apertures to meet the needs of sample measurement. For samples of different sizes and types, it is sometimes necessary to change the measuring aperture. This article introduces the types of colorimeter measuring apertures and how to change them.
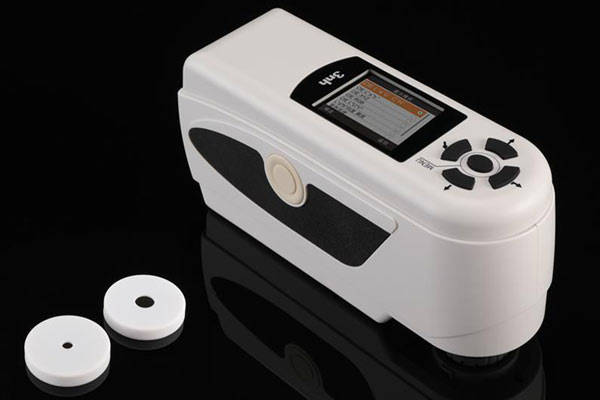
Colorimeter measurement aperture
Colorimeters of different models and functions are equipped with different measuring apertures. Here, we take the NH310 colorimeter, TS7036 spectrophotometer and PS series colorimeter as examples to introduce the types of colorimeter measuring apertures.
The NH310 colorimeter is equipped with three measuring apertures: Φ8mm (standard), Φ4mm (standard), and extended Φ8mm (optional). Users can change the aperture according to their needs. It can not only solve the color difference measurement of curved surfaces, but also measure the color difference of relatively small objects.
TS7036 spectrophotometer is equipped with two types of measuring apertures: Φ8mm/Φ4mm. When the measured surface of the sample is relatively large and uniform, it is recommended to use the Φ8mm measuring aperture. When the measured surface of the sample is relatively small, it is recommended to use the Φ4mm measuring aperture.
PS series spectrophotometers are equipped with Φ8mm measuring apertures, Φ4mm measuring apertures, and Φ1X3 measuring apertures. Different models have different measuring apertures. When the measured surface of the sample is relatively large and uniform, it is recommended to use the Φ8mm measuring aperture. When the measured surface of the sample is relatively small, it is recommended to use the Φ4mm or Φ1X3 measuring aperture.
In addition to the above measurement apertures, the colorimeter also has other measurement apertures such as Φ13mm, Φ15mm, and Φ25mm. Different measurement apertures can meet the different measurement needs of users.
The NH310 colorimeter has three measuring apertures: Φ8mm, Φ4mm, and Φ8mm extended (optional), which can be replaced according to different usage requirements.
1. Disassembly of measuring aperture
As shown in the figure below, rotate the measuring aperture counterclockwise about 20° and then measure the aperture downward.
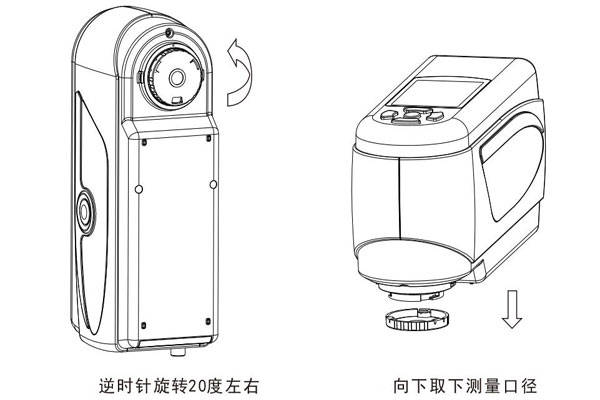
Measuring aperture disassembly
2. Measurement aperture installation
As shown in the figure below, align the measuring aperture with the mounting hole, and then rotate it clockwise about 20°.
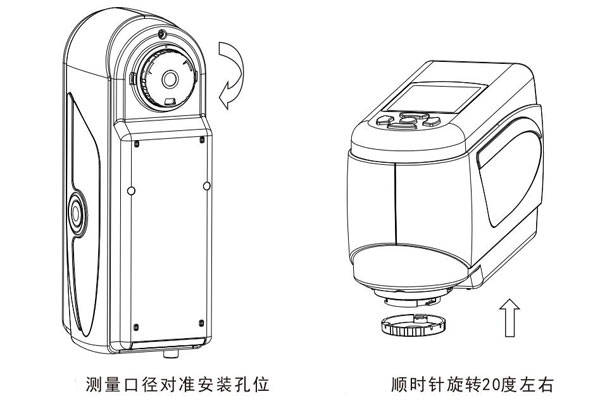
Measuring aperture installation
3. Lengthen the measuring aperture for installation
As shown in the figure below, align the extended measuring aperture with the mounting hole, and then rotate it clockwise about 20°. After the rotation is completed, the arrow on the measuring aperture should be aligned with the concave point on the colorimeter, as shown in the figure below.
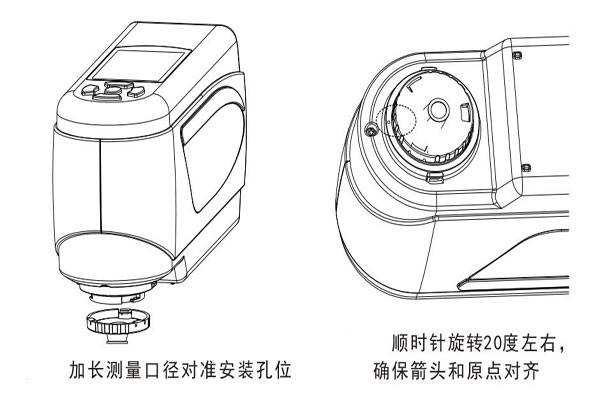
Extended measuring aperture installation
When switching the measurement aperture of the TS7036 colorimeter, the following steps need to be completed:
Step 1: Aperture installation. As shown in the figure below, rotate the measuring aperture counterclockwise and remove the original aperture. Align the measuring aperture to be installed with the mounting hole of the integrating sphere and rotate clockwise. When there is a "click" sound, it means that the measuring aperture and the integrating sphere buckle position are well matched, and the measuring aperture to be installed is installed.
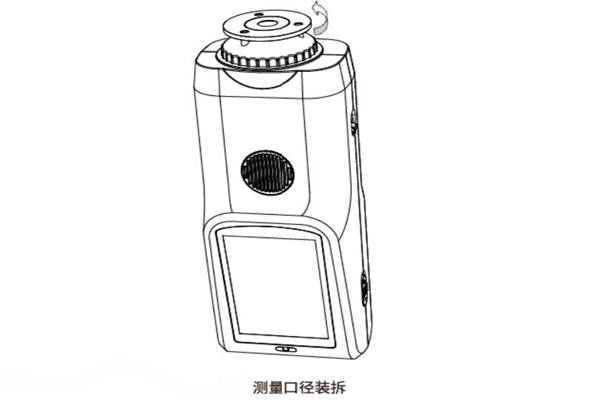
Measuring aperture installation and disassembly
Step 2: Switch the optical lens position. If the assembled aperture is Φ4mm, you need to turn the aperture switch to the SAV position; if it is Φ8mm, you need to turn the aperture switch to the MAV position.
Step 3: Switch the aperture setting in the instrument software. If the measuring aperture in the system settings is set to automatic mode, the instrument will automatically identify the aperture and perform corresponding software processing when re-calibrating the black and white plate; if the measuring aperture in the system settings is set to non-automatic mode, you need to manually set the corresponding Φ8/4mm aperture.
Note: The measurement aperture size, optical lens position, and software aperture settings must be matched to ensure accurate test results. For a Φ4mm aperture, the corresponding optical lens position is SAV, and the software displays it as Φ4mm; for a Φ8mm aperture, the corresponding optical lens position is MAV, and the software displays it as Φ8mm; there is a corresponding display in the status bar of the test interface.
Note: After the measuring aperture is switched, the black and white calibration must be performed again before new data testing can be performed.
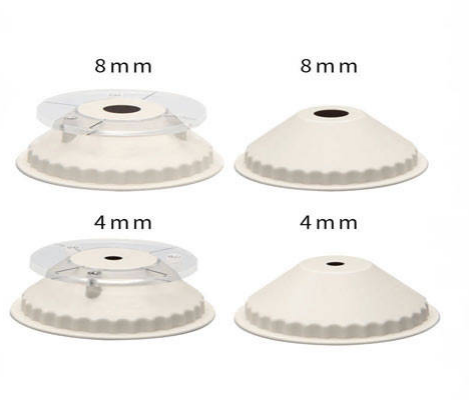
Colorimeter measurement aperture
This series of instruments are equipped with Φ8mm measuring aperture, Φ4mm measuring aperture and Φ1X3 measuring aperture. Different models have different measuring apertures. When the measured surface of the sample is relatively large and uniform, it is recommended to use the Φ8mm measuring aperture. When the measured surface of the sample is relatively small, it is recommended to use the Φ4mm or Φ1X3 measuring aperture.
The following two steps are required to switch the measuring aperture (Φ8mm/Φ4mm/Φ1X3):
Step 1: Aperture installation, rotate the measuring aperture counterclockwise and remove the original aperture; align the measuring aperture to be installed with the mounting hole of the integrating sphere, and rotate clockwise. When there is a "click" sound, it means that the measuring aperture and the integrating sphere buckle position are well matched, that is, the measuring aperture to be installed is installed.
Step 2: Switch the optical lens position. If the measurement aperture is Φ8mm, the aperture switch needs to be turned to the MAV position; if the measurement aperture is Φ4mm, the aperture switch needs to be turned to the SAV position; if the measurement aperture is Φ1X3, the aperture switch needs to be turned to the SAV position.
Step 3: Switch the aperture setting in the instrument software and manually set the corresponding Φ8mm/4mm/Φ1X3 aperture.
Note: The measurement aperture size, optical lens position, and software aperture settings must be matched to ensure accurate test results. For a Φ1X3 aperture, the corresponding optical lens position is SAV, and the software displays it as 1X3; for a Φ4mm aperture, the corresponding optical lens position is SAV, and the software displays it as Φ4; for a Φ8mm aperture, the corresponding optical lens position is MAV, and the software displays it as Φ8; there is a corresponding display in the status bar of the test interface.
Note: After the measuring aperture is switched, the black and white calibration must be performed again before new data testing can be performed.
Find the best mix of quality and insights with our top-notch and helpful articles, all designed to improve your color strategies.
2024-12-16
CIELuv color space and CIELab color space are the two most common uniform color spaces in colorimeter. Both color spaces use three components to describe color, and color is expressed by lightness and chromaticity. So, what do colorimeter CIELuv and CIELab mean? What are the differences? The following is an introduction.
2024-12-17
As an optical instrument, the colorimeter has different measuring angles according to the different angles of light source illumination. The more common ones are 45/0, d/8 and multiple angles. Colorimeters with different measuring angles have different functions and effects. This article introduces the angles and functions of colorimeters.
2024-12-20
As a tool for color quantification, the colorimeter uses the internationally accepted CIELab color space when measuring color, and digitally expresses the color in three dimensions: L, a, and b. This article introduces the range of the colorimeter Lab value and the meaning of the Lab color difference value.
2024-12-20
When measuring color, the colorimeter is based on the most widely used CIELab color space, and the color is expressed as Lab values. So, how do you understand the Lab value of a colorimeter? What is the standard for determining the Lab value of a colorimeter? This article introduces the meaning of the Lab value of a colorimeter and the standard for determining the Lab value.
2024-12-24
When the paint on the car surface ages, peels off or is damaged, the car needs to be repainted. In the process of repainting, the influence of various factors can easily lead to inconsistent colors after paint application. In order to detect the consistency of the color of car paint, a multi-angle colorimeter can be used. This article introduces the method of measuring the color difference of car paint with a multi-angle colorimeter.